
Halloween cookies bring together festive baking and creative decorating for one of the most fun holidays of the year. These treats work great for parties, classroom snacks, or just a fun activity with your family.
You can make spooky shapes like bats and ghosts or go with classic fall designs. You’ll find options that range from easy projects for kids to more detailed designs for experienced bakers.
Each recipe brings its own style to your Halloween celebration, whether you want something cute, spooky, or somewhere in between.
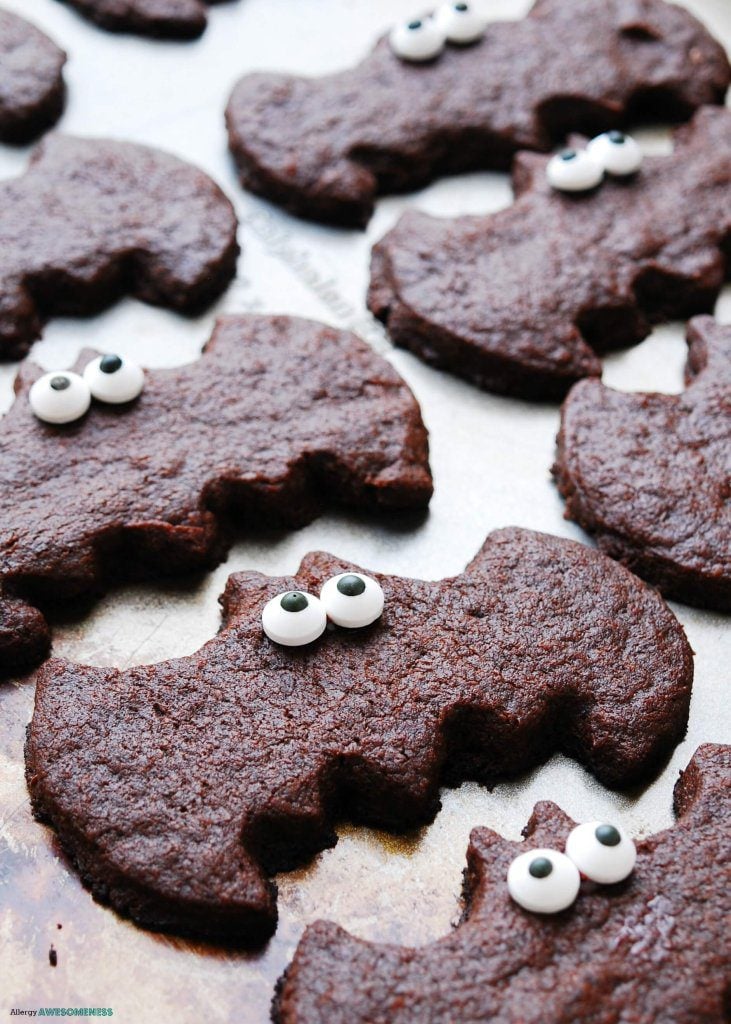
1. Classic Sugar Cookie Bats
Sugar cookie bats are a simple starting point for Halloween baking. You’ll need a basic sugar cookie dough that’s easy to roll out and cut with bat-shaped cookie cutters.
Decorate the cookies with black royal icing. Add candy eyes for a playful look.
These cookies are beginner-friendly and great for baking with kids. The dough holds its shape well during baking, which makes decorating easier.

2. Mummy Cookies with Icing Wraps
Transform simple sugar cookies into spooky treats perfect for your Halloween party. Wrap them in white royal icing or buttercream to create bandage-like stripes across the surface.
Drizzle or pipe the white icing back and forth across each cookie, leaving small gaps between the lines. Before the icing sets, press two candy eyes into each cookie so they peek through the wraps.
Let them sit for 30 minutes until the icing hardens completely.

3. Spider Cookies with Peanut Butter Cup Centers
Combine soft peanut butter dough with chocolate candy centers. Press mini peanut butter cups into warm cookies right after baking.
Create the spider legs with pretzel sticks or melted chocolate piped around the candy. Add candy eyes with a small dab of frosting to complete the look.
Kids can help decorate these cookies for Halloween parties. Enjoy a mix of peanut butter and chocolate flavors in each bite.

4. Twix Thumbprint Cookies
Bring together buttery shortbread, caramel, and chocolate for these cookies. Make a simple shortbread dough and press your thumb into each cookie before baking to create a well.
After the cookies cool, fill the indentations with caramel. Top them with melted chocolate.
Some recipes add crushed Twix pieces for extra crunch. They work well for Halloween parties since you can make the dough ahead of time.

5. Vampire Bite Chocolate Cookies
Turn chocolate chip cookies into vampire dentures for your Halloween guests. Use chocolate chip cookie dough, mini marshmallows, slivered almonds, and red frosting to create the vampire mouth effect.
Sandwich two cookies together with red frosting in between. Add mini marshmallows along the edge to form teeth, then push slivered almonds into the marshmallows to create pointed fangs.
Store-bought or homemade cookie dough both work well. The red frosting mimics a vampire bite, making these cookies fun and easy to prepare with kids.
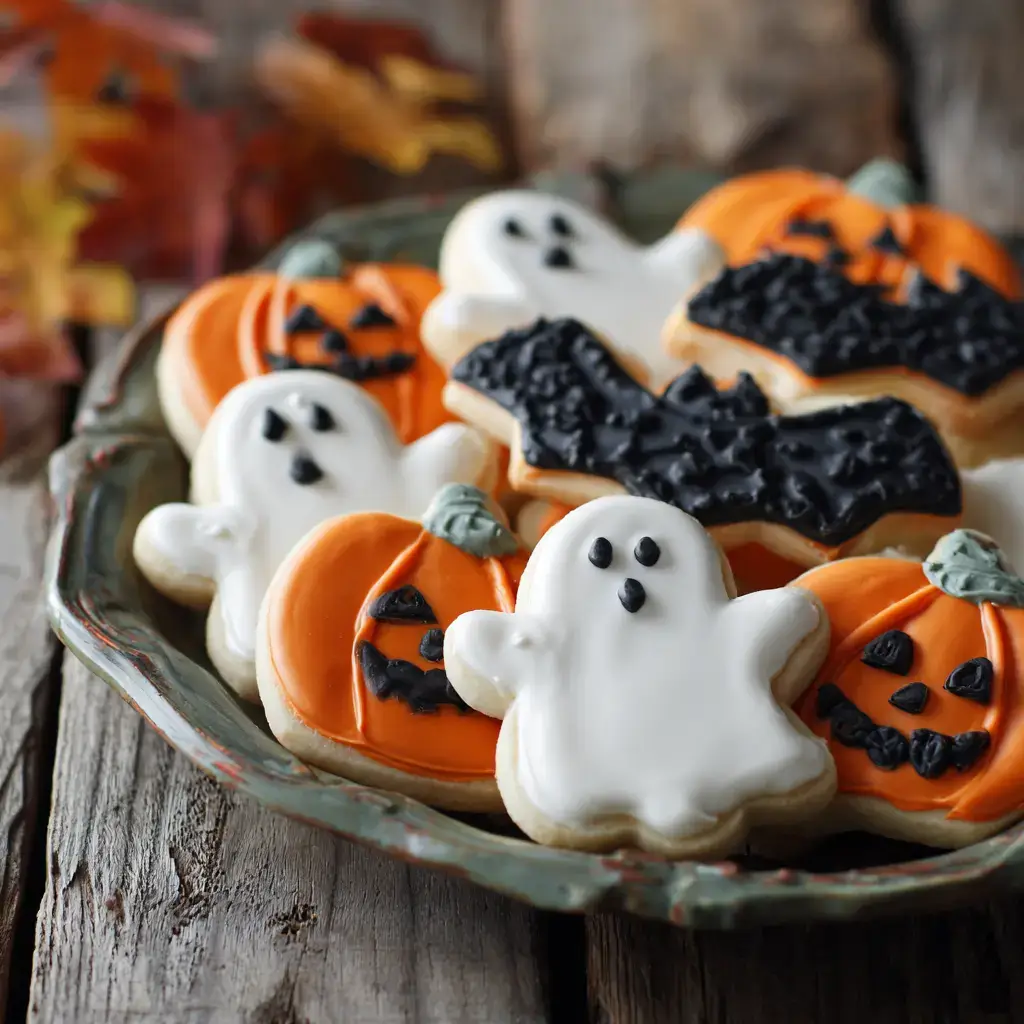
6. Frosted Ghost Sugar Cookies
Frosted ghost sugar cookies combine soft, buttery dough with smooth vanilla or royal icing. Cut the dough into ghost shapes before baking, then decorate each cookie with simple facial details.
Chill your dough before cutting to prevent the cookies from spreading and to keep your ghost shapes defined. Add black gel food coloring for the eyes and mouth.
These cookies work well for Halloween parties or as trick-or-treat gifts.

7. Candy Corn Sugar Cookies
Candy corn sugar cookies bring the iconic Halloween candy to life in cookie form. Create striped layers of yellow, orange, and white dough that look just like real candy corn when sliced and baked.
The cookies have a soft, buttery texture. Make them by dividing your sugar cookie dough into three parts and coloring each one.
The slice-and-bake method makes them simple to prepare without needing cookie cutters.

8. Black Cat Shaped Cookies
Black cat cookies are a fun Halloween treat made with chocolate dough. Most recipes don’t require cookie cutters or a rolling pin.
Shape them by hand and decorate with icing, candy eyes, and sprinkles. The dough typically contains cocoa powder or melted chocolate to create the black color.
Some recipes use black cocoa powder to get a darker shade without food coloring. You can make these cookies soft and chewy or crisp, depending on your preference.

9. Powdered Sugar-Covered Bone Cookies
Shape these bone-shaped cookies by hand or use basic kitchen tools. The white powdered sugar coating gives them a realistic bone appearance.
Kids enjoy helping with these cookies because they’re easy to form and decorate. Pair them with red icing or jam for a bloody effect if you want something more dramatic.
They work well for Halloween parties or school events.

10. Ghostly Brownies
Ghostly brownies bring a fun twist to your Halloween dessert table. Start with a pan of rich, fudgy brownies as your base.
Add marshmallow ghosts on top. Place regular marshmallows on warm brownies so they soften slightly.
Add dots of black icing or candy eyes to give each ghost a spooky face. These treats take about 30 minutes to make from start to finish.
Tips For Baking Perfect Halloween Cookies
Getting your cookie dough right and using proper techniques makes the difference between cookies that look homemade in a good way versus ones that spread too thin or lose their shape.
Choosing the Right Cookie Dough
Sugar cookie dough works best for cut-out shapes because it holds details well and doesn’t spread much during baking. The dough needs to be firm enough to roll out without sticking but soft enough to cut cleanly.
Chill your dough for at least 2 hours before rolling. Cold dough keeps its shape better when you cut it into pumpkins, ghosts, or bats.
If the dough gets warm while you work, put it back in the fridge for 15 minutes. For sandwich cookies with filling, use a slightly softer texture.
Make sure the edges set while the centers stay soft. This creates the right texture for holding frosting or cream between two cookies.
Cutting and Shaping Techniques
Dust your work surface and rolling pin with flour to prevent sticking. Roll the dough to about 1/4 inch thick for cookies that bake evenly and hold their shape.
Press your cookie cutters straight down without twisting. Twisting seals the edges and makes the cookies spread unevenly.
Dip your cutters in flour between cuts to get clean edges on detailed shapes. Place cut cookies on a cold baking sheet.
Space them about 2 inches apart to allow for slight spreading. If you make cookies with small details like spider legs or witch fingers, freeze the shaped cookies for 10 minutes before baking.
Preventing Common Baking Mistakes
Watch your baking time closely. Most Halloween cookies need 8-12 minutes at 350°F.
The edges should look set while centers appear slightly underdone. They’ll firm up as they cool.
Let cookies sit on the baking sheet for 2-3 minutes before moving them to a wire rack. Moving them too soon causes breakage, especially with thin shapes.
Use parchment paper or silicone mats on your baking sheets. This prevents sticking and helps cookies bake evenly.
Rotate your pan halfway through baking if your oven has hot spots.
Decorating Halloween Cookies Like a Pro
You need the right tools, creative techniques, and proper storage methods to make your Halloween cookies stand out.
Essential Tools and Supplies
Start with piping bags and tips in various sizes to control your icing flow. Couplers let you switch between tip sizes without changing bags.
Toothpicks help you spread icing into corners and fix mistakes. Offset spatulas make frosting flat surfaces smooth and even.
Use small paint brushes for adding food coloring details or edible dust. Squeeze bottles help flood cookies with thin icing.
Basic supply checklist:
- Piping bags (disposable or reusable)
- Round tips (#2, #3, and #4)
- Offset spatula (small)
- Toothpicks
- Food coloring gels
- Squeeze bottles
Keep parchment paper nearby for practice runs. Silicone mats prevent sticking when your cookies dry.
Creative Icing and Topping Ideas
Royal icing gives you the best results for detailed designs. Mix it to different consistencies: thick for outlines and thin for flooding.
Outline first, then fill in the shape with thinner icing. Add candy eyes, sprinkles, or sanding sugar while the icing is still wet.
Black and orange nonpareils create texture on pumpkins and spiders. Use licorice laces for spider legs or witch broom bristles.
Try marbling by dropping different colored icing onto wet base icing and swirling with a toothpick. This works great for spiderweb effects.
Edible markers let you draw faces on ghosts after the icing dries. Crushed cookies make great “dirt” for graveyard scenes.
Mini chocolate chips become spider bodies or bat features.
Storing and Packaging Decorated Cookies
Let your decorated cookies dry for 6-8 hours before stacking. Test by gently touching the surface with a clean finger.
Store them in airtight containers with parchment paper between layers. Keep cookies at room temperature for up to two weeks.
Don’t refrigerate them because moisture makes icing weep and colors run. For gifting, place cookies in clear cellophane bags tied with ribbon.
Use small treat boxes with tissue paper to prevent shifting. Pack heavier cookies on the bottom and delicate ones on top.
Freeze undecorated cookies for up to three months in freezer bags. Thaw them at room temperature before decorating.
Frequently Asked Questions
Sugar cookie bats are one of the easiest Halloween cookies to start with. You just need basic sugar cookie dough and a bat-shaped cookie cutter.
Mummy cookies with icing wraps work well for beginners too. Bake simple rectangular or oval cookies and drizzle white icing back and forth to create the mummy bandage effect.
Add two candy eyes and you’re done. Spider cookies with peanut butter cup centers require minimal decorating skills.
Place a peanut butter cup on top of a chocolate cookie and add candy eyes plus pretzel or licorice legs.
Mummy cookies with icing wraps let kids practice their drizzling skills without needing perfect precision. The messy bandage look actually makes these cookies more fun and authentic.
Spider cookies with peanut butter cup centers are perfect because kids can press the candy into the cookie and add the legs themselves. The assembly is simple enough for young children to handle.
Sugar cookie bats give kids a chance to use cookie cutters and help with basic decorating. They can add features with icing or leave them plain.
Black food coloring or activated charcoal creates dark, spooky cookie dough for vampire and bat cookies. Cocoa powder also works for a naturally dark color.
White icing is essential for mummy bandages and spiderweb designs. Candy eyes, which you can buy at most grocery stores, instantly make cookies look more Halloween-themed.
Red gel icing or jam creates blood effects for vampire bite cookies. Orange food coloring turns standard cookie dough into pumpkin-colored treats.
Switch your regular cookie cutters for Halloween shapes like bats, ghosts, pumpkins, or tombstones. This simple change transforms any sugar cookie recipe into a Halloween treat.
Add orange or black food coloring to your cookie dough before baking. You can also mix in Halloween-colored candies or chocolate chips.
Change up your decorating with seasonal colors and designs. Use white icing for ghosts and mummies, orange for pumpkins, or red for vampire themes.
Twix thumbprint cookies offer a more sophisticated option with their caramel and chocolate combination. Make a thumbprint in each cookie and fill it with chopped Twix bars.
Vampire bite chocolate cookies work well for adults when you use dark chocolate and add a touch of espresso powder to the dough. Fill the “bite marks” with red jam to create an elegant yet spooky presentation.
Add a tablespoon of bourbon or rum extract to your cookie dough for a boozy version. Keep the decorations simple and elegant.
Start by purchasing Pillsbury sugar cookie dough from your grocery store. Let it sit at room temperature for about 10 minutes to make it easier to work with.
Roll out the dough on a floured surface to about 1/4 inch thickness. Use Halloween cookie cutters to cut out your shapes.
Place the shapes on a baking sheet. Bake according to the package directions, usually 8-10 minutes at 350°F.
Let the cookies cool completely. Decorate them with store-bought icing and Halloween candies.